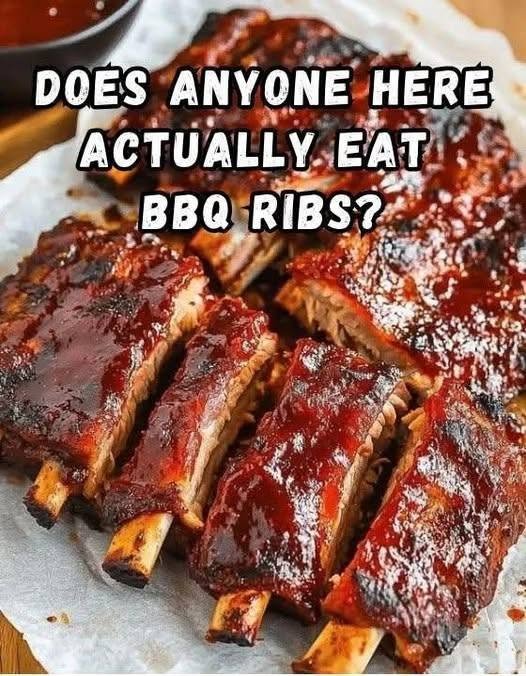
BBQ Ribs are the ultimate comfort food, featuring tender, juicy meat coated in a smoky, sweet, and tangy barbecue sauce. Whether you’re preparing a weekend family dinner, hosting a backyard cookout, or planning a summer gathering, homemade barbecue ribs are always a crowd-pleaser.
This easy BBQ Ribs recipe uses a flavorful dry rub, slow oven cooking, and a generous coating of barbecue sauce to create ribs with incredible flavor. You don’t need a smoker or an outdoor grill to make delicious ribs at home. Your oven can do most of the work, leaving you with beautifully glazed ribs that are tender, savory, and satisfying.
Serve these ribs with creamy coleslaw, baked beans, cornbread, or crispy potato wedges for a complete barbecue-style meal.
Recipe Overview
-
Prep Time: 15 minutes
-
Cook Time: 2½–3½ hours
-
Total Time: Approximately 3 hours
-
Servings: 4
-
Course: Main Course
-
Cuisine: American
-
Cooking Method: Oven-baked
-
Difficulty: Easy
Ingredients
For the BBQ Ribs
-
3–4 pounds pork baby back ribs or spare ribs
-
1 tablespoon olive oil
-
1 cup barbecue sauce, homemade or store-bought
-
2 tablespoons apple cider vinegar
-
2 tablespoons water or apple juice
-
1 tablespoon honey, optional
-
1 teaspoon Worcestershire sauce, optional
For the Homemade BBQ Dry Rub
-
2 tablespoons brown sugar
-
1 tablespoon paprika
-
1 teaspoon smoked paprika
-
1 teaspoon garlic powder
-
1 teaspoon onion powder
-
1 teaspoon salt
-
½ teaspoon ground black pepper
-
½ teaspoon chili powder
-
¼ teaspoon cayenne pepper, optional
Optional Homemade BBQ Sauce
If you prefer to make your own sauce, combine the following ingredients:
-
1 cup ketchup
-
2 tablespoons brown sugar
-
2 tablespoons apple cider vinegar
-
1 tablespoon Worcestershire sauce
-
1 tablespoon honey
-
1 teaspoon smoked paprika
-
½ teaspoon garlic powder
-
¼ teaspoon black pepper
-
1–2 tablespoons water, as needed
Equipment Needed
-
Large baking sheet or roasting pan
-
Aluminum foil
-
Small mixing bowl
-
Measuring cups and spoons
-
Sharp knife
-
Cutting board
-
Pastry brush or spoon
-
Tongs
-
Meat thermometer, if available
Ingredient Notes
Pork ribs: Baby back ribs are smaller, leaner, and generally cook faster. Spare ribs are larger and fattier, with a richer flavor, and may require additional cooking time.
Brown sugar: Adds sweetness to the rub and helps create a caramelized exterior during the final glazing stage.
Smoked paprika: Gives the ribs a smoky barbecue flavor even when cooked in an oven.
Barbecue sauce: Choose a sweet, smoky, spicy, or tangy sauce according to your preference.
Apple cider vinegar: Adds acidity that balances the richness of the meat and sweetness of the sauce.
Honey: Optional, but it gives the sauce a glossy finish and a touch of sweetness.
Worcestershire sauce: Adds a savory, slightly tangy depth to the barbecue flavor.
Instructions
Step 1: Prepare the Ribs
-
Preheat your oven to 300°F (150°C).
-
Remove the ribs from their packaging and pat them dry with paper towels.
-
Place the ribs on a clean cutting board with the bone side facing up.
-
Check whether the thin membrane on the bone side is still attached.
-
If present, loosen it with a knife and carefully pull it away using a paper towel for grip.
-
Trim away any excess fat if necessary.
-
Brush both sides of the ribs lightly with olive oil.
Removing the membrane helps the seasoning reach the meat more evenly and can improve the texture of the finished ribs.
Step 2: Make the BBQ Dry Rub
-
In a small bowl, combine the brown sugar, paprika, smoked paprika, garlic powder, onion powder, salt, black pepper, chili powder, and optional cayenne pepper.
-
Mix thoroughly until all the ingredients are evenly distributed.
-
Taste a tiny pinch of the mixture if desired, keeping in mind that it is concentrated seasoning.
The brown sugar adds sweetness, while the paprika and spices create a savory barbecue crust.
Step 3: Season the Ribs
-
Sprinkle the dry rub generously over both sides of the ribs.
-
Massage the seasoning gently into the meat.
-
Pay special attention to the thicker portions and the edges.
-
Allow the ribs to rest for 15–30 minutes while the oven heats, or refrigerate them covered for several hours for deeper seasoning.
If you refrigerate the ribs after seasoning, keep them covered and bring them out only when you’re ready to cook.
Step 4: Wrap the Ribs in Foil
-
Place the seasoned ribs on a large sheet of heavy-duty aluminum foil.
-
If necessary, use two layers of foil to prevent leaks.
-
Mix the apple cider vinegar with the water or apple juice.
-
Pour the liquid around the ribs rather than directly washing off the seasoning.
-
Wrap the ribs tightly in foil, sealing the edges to trap steam.
-
Place the foil packet on a baking sheet with the bone side facing down.
The foil helps retain moisture and allows the ribs to cook slowly until tender.
Step 5: Bake the Ribs Slowly
For baby back ribs, bake at 300°F (150°C) for approximately 2½–3 hours.
For larger spare ribs, allow approximately 3–3½ hours, sometimes longer depending on thickness.
Check the ribs near the end of the estimated cooking time. They should be tender when pierced with a fork, and the meat should begin to pull back from the ends of the bones.
Avoid relying on cooking time alone. Ribs are best judged by tenderness and internal temperature. For tender pork ribs, a temperature around 195–203°F (90–95°C) is often useful, although food safety and tenderness are not exactly the same thing.
Step 6: Prepare the BBQ Sauce
While the ribs bake, prepare the optional homemade barbecue sauce.
-
Add the ketchup, brown sugar, apple cider vinegar, Worcestershire sauce, honey, smoked paprika, garlic powder, and black pepper to a small saucepan.
-
Add 1 tablespoon of water to loosen the mixture.
-
Place over medium-low heat.
-
Stir frequently until the sauce begins to simmer gently.
-
Reduce the heat and cook for 5–8 minutes, stirring occasionally.
-
Add another tablespoon of water if the sauce becomes too thick.
-
Remove from the heat and set aside.
If using store-bought barbecue sauce, you can skip this step.
Step 7: Unwrap and Glaze the Ribs
-
Carefully remove the baking sheet from the oven.
-
Open the foil cautiously because hot steam will escape.
-
Transfer the ribs to a clean foil-lined baking sheet or leave them on the original tray if it is suitable.
-
Discard the cooking liquid.
-
Brush a generous layer of barbecue sauce over the top of the ribs.
-
Turn the ribs carefully and brush the other side if desired.
The ribs should already be tender before you add the final sauce. This stage creates the sticky, flavorful coating associated with classic BBQ ribs.
Step 8: Caramelize the Sauce
Increase the oven temperature to 425°F (220°C).
-
Return the uncovered ribs to the oven.
-
Bake for 8–12 minutes, until the sauce becomes glossy and lightly caramelized.
-
For a thicker glaze, brush on another layer of sauce and bake for an additional 3–5 minutes.
-
Watch carefully because barbecue sauce contains sugar and can burn quickly.
Alternatively, you can briefly use the broiler, keeping the ribs several inches from the heating element and watching them continuously.
Step 9: Rest and Slice the Ribs
-
Remove the ribs from the oven.
-
Let them rest for approximately 5–10 minutes.
-
Place them on a cutting board with the bone side facing up.
-
Slice between the bones with a sharp knife.
-
Arrange the ribs on a serving platter.
-
Serve with extra barbecue sauce on the side.
Resting helps the juices settle and makes the ribs easier to handle.
Tips for the Best BBQ Ribs
1. Cook low and slow. Lower oven temperatures help the connective tissue soften gradually, resulting in tender ribs.
2. Remove the membrane. This improves the eating texture and helps the seasoning coat the meat more evenly.
3. Season generously. Ribs have plenty of surface area, so make sure both sides are well coated.
4. Keep them covered during the main cooking stage. Foil traps moisture and prevents the meat from drying out too quickly.
5. Add barbecue sauce near the end. Sugary sauce can burn during long cooking, so glaze the ribs after they have become tender.
6. Use a thermometer when possible. Check the thickest meaty portion without touching the bone. Tenderness is especially important when cooking ribs.
7. Apply more than one layer of sauce. A final thin layer after the first glaze can create a richer, stickier finish.
8. Avoid cutting too soon. Let the ribs rest briefly before slicing so they are easier to handle.
BBQ Ribs Variations
1. Honey BBQ Ribs
Add 2 tablespoons of honey to the barbecue sauce for a sweeter, glossy finish. Watch the ribs closely during the final glazing stage because honey can brown quickly.
2. Spicy BBQ Ribs
Add extra cayenne pepper, chili powder, or a few teaspoons of hot sauce to the barbecue sauce. This variation is ideal for anyone who enjoys a little heat.
3. Smoky Southern BBQ Ribs
Increase the smoked paprika and use a smoky barbecue sauce. If you have access to an outdoor grill, finish the cooked ribs over indirect heat for an additional layer of smoky flavor.
4. Brown Sugar BBQ Ribs
Add an extra tablespoon of brown sugar to the rub for a sweeter crust. Be careful not to let the sugar scorch during the final glazing stage.
5. Garlic BBQ Ribs
Add an extra teaspoon of garlic powder to the rub and a little minced garlic to the homemade sauce. This creates a deeper savory flavor.
6. Grilled BBQ Ribs
Cook the ribs until tender in the oven or over indirect grill heat first. Then brush with barbecue sauce and finish over medium heat for a few minutes per side, watching carefully to prevent burning.
What to Serve with BBQ Ribs
BBQ ribs pair beautifully with classic barbecue sides. Try serving them with:
-
Creamy coleslaw
-
Cornbread or dinner rolls
-
Baked beans
-
Macaroni and cheese
-
Roasted corn on the cob
-
Crispy potato wedges
-
Potato salad
-
Roasted vegetables
-
Pickles and sliced onions
For a traditional barbecue plate, combine the ribs with coleslaw, cornbread, and baked beans.
Common Mistakes to Avoid
Cooking at too high a temperature: High heat can dry out the meat before the connective tissue softens. Slow cooking is the key to tender ribs.
Adding sauce too early: Barbecue sauce can burn if exposed to heat for the entire cooking period. Apply it toward the end.
Not wrapping the ribs properly: Loose foil allows too much moisture to escape. Seal the foil packet tightly.
Overcooking without checking: Ribs can become mushy if cooked excessively. Check for tenderness as the estimated cooking time approaches.
Using too much liquid: The ribs need a little moisture to create steam, not enough to boil in liquid.
Skipping the final glaze: The final uncovered cooking stage gives the sauce its characteristic sticky texture.
Storage and Reheating
Refrigerator: Refrigerate leftover ribs in an airtight container within two hours of cooking. Store for 3–4 days.
Freezer: Freeze cooked ribs in airtight, freezer-safe packaging for up to 2–3 months for best quality.
Oven reheating: Place ribs in a baking dish with a tablespoon or two of water or barbecue sauce. Cover with foil and heat at 300°F (150°C) until the center reaches 165°F (74°C).
Microwave reheating: Place individual portions in a microwave-safe dish, cover loosely, and heat in short intervals until thoroughly hot.
Make-ahead tip: Cook the ribs until tender a day in advance, cool and refrigerate them promptly, then brush with barbecue sauce and finish in a hot oven shortly before serving.
Frequently Asked Questions
What is the best type of ribs for BBQ?
Baby back ribs are a great choice when you want a smaller rack that cooks relatively quickly. Spare ribs have more fat and connective tissue and often produce a richer flavor. Both work well with this recipe.
How do I make BBQ ribs tender without a smoker?
Bake the ribs slowly in a tightly sealed foil packet with a small amount of liquid. Once tender, uncover them, brush with barbecue sauce, and bake at a higher temperature to caramelize the glaze.
Should I boil ribs before baking?
No. Boiling is not necessary for this recipe. Slow oven cooking in foil helps tenderize the ribs while preserving flavor.
How do I know when BBQ ribs are done?
The meat should be tender when pierced, and it will generally have pulled back slightly from the bone ends. A thermometer reading around 195–203°F (90–95°C) in the meaty portion often indicates the tenderness many people prefer.
Can I use bottled barbecue sauce?
Absolutely. A good store-bought sauce makes this recipe even easier. Choose a flavor you enjoy and add a little honey, vinegar, or hot sauce if you want to customize it.
Can I make BBQ ribs without aluminum foil?
Yes. Use a covered roasting pan or oven-safe Dutch oven. Make sure the container retains moisture, and check the ribs during cooking so they do not dry out.
Why are my BBQ ribs tough?
They may need more cooking time. Ribs contain connective tissue that requires time to soften. Continue cooking in covered conditions and check again after 15–20 minutes.
Can I make these ribs in an air fryer?
You can, but a full rack may not fit. Cut the rack into smaller sections, cook at a moderate temperature until tender, and apply barbecue sauce near the end. Cooking times depend on the air fryer and the thickness of the ribs.
Nutrition Facts
Estimated nutrition per serving, assuming four servings and using pork ribs with barbecue sauce. Actual values vary depending on the rib cut, trimming, sauce, and portion size.
| Nutrient | Approximate Amount |
|---|---|
| Calories | 550–750 |
| Protein | 35–50 g |
| Total Fat | 35–50 g |
| Saturated Fat | 12–18 g |
| Carbohydrates | 18–30 g |
| Sugars | 15–25 g |
| Sodium | 700–1,200 mg |
Nutrition estimates are approximate and do not represent laboratory-tested values.
Final Thoughts
These homemade BBQ Ribs are a delicious way to enjoy classic barbecue flavor without needing special equipment. Slow oven cooking creates tender meat, while the seasoned dry rub and sticky barbecue glaze add sweetness, smokiness, and savory depth.
Serve them with your favorite Southern side dishes for a satisfying family meal, or make them the centerpiece of your next gathering. With a little patience and a gen